Category Archives: Programming

Capistrano with Bundler and RVM

最近、新しい Rails サーバを立ち上げる必要が出てきて、一から Capistrano によって deploy をする必要に迫られました。

Capistrano についてはいろいろなところで良質な記事があるので、それ自体を使うのは難しくはないと思うのですが、 RVM や Bundler を使用した環境で使用する場合に結構はまってしまったので、記録しておこうと思います。

サーバ側で RVM を使用する場合

RVM: Ruby Version Manager – RVM with Crapistrano を参照し、Ruby 1.9.2 を使うのであれば、以下の3行を deploy.rb に書き加えます。

$:.unshift(File.expand_path('./lib', ENV['rvm_path']))
require "rvm/capistrano"
set :rvm_ruby_string, '1.9.2'
set :rvm_type, :user

deploy 時に Bundler で Gem を更新する場合

deploy 時に bundle install で Gem をインストールしてほしいと思います。

大前提として、 Bundler を最新版にしておくことが重要です。
自分の場合、古いバージョンが入っていて上手く動きませんでした。

config/deploy.rb に

require "bundler/capistrano"

と書いておけば、 deploy 時に標準では shared/bundle フォルダに bundle install をしてくれます。

Google Data APIs Objective-C Client LibraryをiOS SDKで使用するための準備

以下の文章は、Google Data APIs Objective-C Client LibraryをiOS SDKで使用するための準備 | アクトインディ技術部隊報告書と同じものです。

今回はGoogle Data APIs Objective-C Client LibraryをiOS SDKで使用するための準備について書きたいと思います。

Google Data APIs Objective-C Client LibraryはGoogleの様々なサービスをObjective-Cから使うことができるライブラリです。
Google Data APIs Objective-C Client Library

あらかじめGData.xcodeprojを、ライブラリを使用したいプロジェクトの「ファイルとグループ」欄に追加しておきましょう。

ライブラリをコンパイルする

コンパイルオプションを指定してコンパイルします。
今回はPicasaサービスとそれに付随してOAuthを使用したので、以下のオプションを指定しました。

-DGDATA_INCLUDE_PHOTOS_SERVICE=1
-DGDATA_INCLUDE_OAUTH=1

iPhone Simulator版とiPhone OS版をReleaseでコンパイルします。

lipoでFat Binaryにする

cd build
lipo -create Release-iphoneos/libGDataTouchStaticLib.a Release-iphonesimulator/libGDataTouchStaticLib.a -output libGDataTouchStaticLib.a

コンパイルしたライブラリをXcodeに追加する

  • Xcodeの「ターゲット」でアプリを指定し右クリックし「情報を見る」を選択。
  • 「一般」 – 「リンク済みライブラリ」の下の「+」をクリック。
  • 「その他を追加…」をクリックし、さきほどコンパイルしたlibGDataTouchStaticLib.aを選択。

コンパイルするための設定を追加する

  • プロジェクトを右クリックし、「情報を見る」を選択。
  • 「ビルド」を選ぶ。
  • 「ヘッダ検索パス」に/usr/include/libxml2を追加。
  • 「ユーザヘッダ検索パス」にライブラリのフォルダを追加(このとき「再帰的」にチェックを入れる)。
  • 「常にユーザパスを検索」にチェックを入れる。
  • 「他のリンカフラグ」に -all_load -ObjC -lxml2 を指定。

参考文献

Objective-Cでメンバ変数に動的にアクセスする方法

以下の文章はObjective-Cでメンバ変数に動的にアクセスする方法 | アクトインディ技術部隊報告書と同様のものです。

今回、複数回使い回したいViewがあったのですが、一方で様々なところで使われるものではありませんでした。
こんなときにわざわざクラスを作るのはどうも重い感じがしてしまいます。
そこでUIViewのサブクラスを作らずに、メソッドで作ることにしました。

  • UIViewController
    • 今回作成したいView
    • 今回作成したいView

というように複数個必要です。
このViewの中身はUILabelが2つだけ。

さらに出来ることなら、作成するViewの中身であるUILabelを、このViewを持っているViewControllerのメンバ変数からアクセスしたい。
以前はTagを割り当ててアクセスしていたのですが、意外と面倒だったのでそれ以外の方法がないかどうか調べてみました。

実際には以下のようなコードを使用することで出来ました。

#include <objc/runtime.h>

@implementation HogeViewController

- (UIView *)generateView:(NSString *)titleLabelName contentLabelName:(NSString *)contentLabelName
{
    UIView   *resultView;
    UILabel  *titleLabel, *contentLabel;

    // 便宜上CGRectZeroを使います。
    resultView = [[[UIView alloc] initWithFrame:CGRectZero] autorelease];

    titleLabel = [[UILabel alloc] initWithFrame:CGRectZero];
    [resultView addSubview:titleLabel];
    [titleLabel release];

    object_setInstanceVariable(self, [titleLabelName UTF8String], titleLabel);

    contentLabel = [[UILabel alloc] initWithFrame:CGRectZero];
    [resultView addSubview:contentLabel];
    [contentLabel release];

    object_setInstanceVariable(self, [contentLabelName UTF8String], contentLabel);

    return resultView;
}

@end

titleLabelName, contentLabelNameにはそれぞれに割り当てたいメンバ変数の名称を指定します。
こんな感じにobject_setInstanceVariable関数を使用してあげれば、割り当てたいメンバ変数に割り当てることが出来ます。

P.S.
といいつつも、実は様々なところで使われる必要がわかり、まじめにUIViewのサブクラスを作成したため、上記のコードはお蔵入りになりました。

参考文献

UITableViewにcellを動的に追加/削除する2つの方法。

以下の文章はUITableViewにcellを動的に追加/削除する2つの方法。 | アクトインディ技術部隊報告書と同様のものです。

UITableViewにcellを動的に追加/削除するということについて書こうと思います。

特にこれまでUITableViewのbeginUpdatesとendUpdatesという二つのメソッドを、いったいどんな場合に使用したらいいのか明確になっていませんでした。
ここら辺を重点的に書きたいと思います。

以下のAppleの公式ドキュメントにかなり詳しく書かれています。
Table View Programming Guide for iPhone OS: Inserting and Deleting Rows and Sections

cellを一つずつ追加/削除していく場合

cellを一つずつ追加/削除していく場合には、beginUpdates/endUpdatesの出番はありません。
追加/削除したいcellのindexPathを作成してinsert(or delete)RowsAtIndexPaths:withRowAnimation:メソッドを呼ぶだけ。
単純です。

ただし注意点はinsertRowsAtIndexPaths:withRowAnimation:メソッドを呼ぶと、UITableViewDataSourceのtableView:cellForRowAtIndexPath:メソッドが呼ばれるということ。
すなわち、cellの中身をNSArray等で管理している場合にはあらかじめNSArrayの内容を変更しておかなければなりません。

cocoa*life – UITableViewCellを削除ボタンを使って削除する

複数のcellをいっぺんに追加/削除する場合

ここまではbeginUpdatesやendUpdatesを使用する必要はありません。
では、どういうときに使用するべきなのか?

ポイントはbeginUpdates/endUpdatesに関することが書かれているセクションのタイトルがBatch Insertion and Deletion of Rows and Sectionsであるということ。
batchというのは英語で束という意味なので、「いっぺん」に複数のcellを処理したいときに使うということになります。

つまり、このメソッドを使用するかしないかの選択基準の違いは、一つずつかいっぺんかということになります。
もちろん複数のcellを追加/削除したい場合であっても、一つずつ追加/削除することができます。

beginUpdatesとendUpdatesで追加/削除のメソッド群を挟みます。
endUpdatesを呼び出したあと、tableView:cellForRowAtIndexPath:メソッドが呼ばれ、追加と削除の結果が表示されます。

beginUpdatesとendUpdatesで挟まれた追加/削除の挙動は、公式ドキュメントに以下のように書かれています。

The code calls the deleteRowsAtIndexPaths:withRowAnimation: method after it calls insertRowsAtIndexPaths:withRowAnimation:. However, this is not the order in which UITableView completes the operations. It defers any insertions of rows or sections until after it has handled the deletions of rows or sections. This happens regardless of ordering of the insertion and deletion method calls.

Deletions within an animation block specify which rows and sections in the original table should be removed; insertions specify which rows and sections should be added to the resulting table.

引用元: Table View Programming Guide for iPhone OS: Inserting and Deleting Rows and Sections(強調は引用者による)

この文章をまとめてみました。
(前提条件としてbeginUpdates/endUpdatesで囲まれている中では)

  • deleteRowsAtIndexPaths:withRowAnimation:メソッドをinsertRowsAtIndexPaths:withRowAnimation:メソッドの前に呼ぶことは必須ではない(not the order)。
  • 実際のcellの追加は削除のあとに行われる。上記メソッドの呼び出し順序は影響を及ぼさない(regardless of ordering of the insertion and deletion)。
  • 削除時のindexPathにはbeginUpdates呼び出し前、元々の(original)テーブルに対するものを指定し、追加時は削除後の結果となる(resulting)テーブルに対するものを指定する。

このような仕組みにすることで、以下のページに書かれているように1つのcellを削除するごとにindexPathを調整することが必要なく、削除を直感的に行うことが出来ます。
テーブルのセルの削除や追加にbeginUpdates/endUpdatesは必要か(2) – iPhoneアプリ開発まっしぐら★ – iPhoneアプリ開発グループ

ということで、beginUpdates/endUpdatesメソッドはcellをいっぺんに追加/削除したい場合に使えばよい!ということになります。

参考文献

Core Animationで遊んでみる (2)

以下はCore Animationで遊んでみる (2) | アクトインディ技術部隊報告書と同じものです。

以前のエントリに引き続き、Core Animationで少し遊んでみたいと思います。
これも簡単にできるフェード処理です。

以前のエントリと同様、QuartzCore.frameworkをincludeし

#import <QuartzCore/QuartzCore.h>

とimportすることが必要です。

さて実際にフェード処理を記述してみましょう。
たとえば、hogeViewというViewをフェードアウトしてみます。

CATransition    *transition;
transition = [CATransition animation];

// トランジション時間の設定(これだと1秒)。
[transition setDuration:1.0f];

// トランジションの種類の設定、今回はフェード。
[transition setType:kCATransitionFade];

// トランジション中に起こす処理を記述。
[hogeView setHidden:YES];

// トランジションを実行。
[[[self view] layer] addAnimation:transition forKey:@"layerAnimation"];

フェードインの時はsetHiddenをNoですね。

この方法を用いて、もう一つサンプルを書いてみます。
UINavigationItemのright/leftButtonItemを設定する際にはanimated:YESとすることでフェードイン/アウトしてくれますが、TitleViewはそのような項目はないのでこの方法を使えないかと思いやってみたらできました。

TitleViewにはUISegmentedControlを設定することにします。

CATransition    *transition;
transition = [CATransition animation];

[transition setDuration:1.0f];
[transition setType:kCATransitionFade];
[[self navigationItem] setTitleView:segmentedControl];
[[[[self navigationController] navigationBar] layer] addAnimation:transition forKey:@"layerAnimation"];

Core Animationで遊んでみる (1)

以下はCore Animationで遊んでみる (1) | アクトインディ技術部隊報告書と同様のものです。

Mac OS X 10.5 Leopardの目玉機能の一つはCore Animationでした。
Appleの触れ込みによると、Core Animationを利用すると簡単にアニメーション処理を追加することができるそうです。

なんですが、アニメーションではないところでも、便利に使うことができます。
今回はiPhone SDKを用いて、そのちょっと便利な使い方を書こうと思います。

以下のサンプルでは全部
QuartzCore.frameworkをincludeし

#import <QuartzCore/QuartzCore.h>

とimportをすることが必要です。

UIViewを角丸にする

UIViewを角丸にするのはとても簡単です。

[[view layer] setCornerRadius:10.0];
[view setClipsToBounds:YES];

UIViewに枠線を追加する

[[view layer] setBorderColor:[[UIColor lightGrayColor] CGColor]];
[[view layer] setBorderWidth:1.0];

setBorderColorメッセージの引数はCGColorなので、上記のようにUIColorからCGColorに変更してあげる必要があります。

UITextFieldに入力されている文字数を動的に、非同期に数える。

以下はUITextFieldに入力されている文字数を動的に、非同期に数える。 | アクトインディ技術部隊報告書と同じものです。

とあるUITextFieldによる入力フォームと、UIBarButtonItemによる「完了」ボタンがある画面を考えます。

今回のエントリの目的はUITextFieldに文字が入力されていない、つまり空であるときは、「完了」ボタンを表示しない画面を作成するということです。

ポイントはUIControlEventEditingChangedイベントを使うこと。
最初はUITextFieldDelegateのtextField:shouldChangeCharactersInRange:replacementString:とかを使用することを考えましたが、文字を消去したときにボタンが消えない等々うまくいきませんでした。

サンプルコードを書いてみます。

- (void)setupUserInterface
{
    UIView      *contentView;
    UITextField *textField;

    contentView = [[UIView alloc] initWithFrame:[[UIScreen mainScreen] bounds]];
    [self setView:contentView];
    [contentView release];

    doneButton = [[UIBarButtonItem alloc] initWithBarButtonSystemItem:UIBarButtonSystemItemDone
                                                               target:self
                                                               action:@selector(respondsToDoneButtonTouchDown:)];

    textField = [[UITextField alloc] initWithFrame:CGRectMake(0, 0, 100, 20)];
    [contentView addSubview:textField];
    [textField release];
    [textField addTarget:self
                  action:@selector(respondsToEditingChanged:)
        forControlEvents:UIControlEventEditingChanged];
}


- (void)respondsToEditingChanged:(id)sender
{
    if ([sender isKindOfClass:[UITextField class]])
    {
        // 本当はsenderを用いずにメンバ変数とかにしておけばいいのだけれど、今回はあえて型変換をしてみる。
        if ([[(UITextField *)sender text] length])
        {
            [[self navigationItem] setRightBarButtonItem:doneButton animated:YES];
        }
        else
        {
            [[self navigationItem] setRightBarButtonItem:nil animated:YES];
        }
    }
}

参考
Disable button if textField is empty – iPhone SDK Development

iPhoneによる位置情報関係のまとめ

以下はiPhoneによる位置情報関係のまとめ | アクトインディ技術部隊報告書と同様のものです。

今回も前回のGeohashに引き続き、位置情報に関する内容です。
ググれば出てくる内容なので、新しいことはなんにもないのが申し訳ないところです。

位置情報に関するライブラリは

  • CoreLocation
  • MapKit

などがあります。

GPSで現在位置を取得するにはCoreLocationを使用し、地図を表示したり現在地の大まかな住所を取得するためにはMapKitを使用します。

GPSで現在位置を取得するには

CoreLocationではCLLocationManagerDelegateを実装し

- (void)setup
{
    CLLocationManager *locationManager = [[CLLocationManager alloc] init];
    if ([locationManager locationServicesEnabled])
    {
        [locationManager setDelegate:self];
        [locationManager setDesiredAccuracy:kCLLocationAccuracyBest];
        [locationManager setDistanceFilter:kCLDistanceFilterNone];
    }
}

- (void)locationManager:(CLLocationManager *)manager didUpdateToLocation:(CLLocation *)newLocation fromLocation:(CLLocation *)oldLocation
{
    NSLog(@"%@", newLocation);
}

このようにすればLogに現在地の情報が取得できます。

地図を表示するには

- (void)setup
{
    CGRect screen = [[UIScreen mainScreen] bounds];
    MKMapView *mapView = [[MKMapView alloc] initWithFrame:screen];
    [[self view] addSubview:mapView];
    [mapView release];

    MKCoordinateRegion  region;
    region.center = [location coordinate];
    region.span.latitudeDelta = 0.005;
    region.span.longitudeDelta = 0.005;
    [mapView setRegion:region animated:YES];
}

とすれば、locationで指定した座標に移動します。

現在地を取得するには

MKReverseGeocoderDelegateを実装し

- (void)setup
{
    MKReverseGeocoder *reverseGeocoder = [[MKReverseGeocoder alloc] initWithCoordinate:[location coordinate]];
    [reverseGeocoder setDelegate:self];
    [reverseGeocoder start];
}

- (void)reverseGeocoder:(MKReverseGeocoder *)geocoder didFindPlacemark:(MKPlacemark *)placemark
{
    NSLog(@"%@", [placemark title]);
}

とすることで取得することができます。
すべてのAPIが非常にシンプルに作られているので、使用するのは非常に簡単です。

Objective-C的???Geohash

以下はObjective-C的???Geohash | アクトインディ技術部隊報告書と同様のものです。

先日chibaさんがGeohashをdecodeするものをCLで書いていらしたので、それを微妙に参考にしながらCocoaのCoreLocationのCLLocationにgeohashをencode/decodeするメソッド追加してみました。

本当はビット演算がしたいのですが、文字列処理の方が自分には単純で簡単だったため、とりあえず今回は文字列処理にしてみました。

我ながらひどいコードだと思いますので、これからリファクタリングをしていきたいところです。

[CLLocation+Geohash.h]

#import <CoreLocation/CoreLocation.h>
#import <Foundation/Foundation.h>


@interface CLLocation(Geohash)

@property (nonatomic, readonly)   NSString    *geohash;

+ (CLLocation *)locationFromGeohash:(NSString *)aGeohash;

@end

[CLLocation+Geohash.m]

#import "CLLocation+Geohash.h"

#include <math.h>

NSString *int_to_binary(NSUInteger input)
{
    if (input == 1 || input == 0)
    {
        return [NSString stringWithFormat:@"%d", input];
    }

    return [NSString stringWithFormat:@"%@%d", int_to_binary(input / 2), input % 2];
}


double parse_binary(NSString *binary, double max, double min)
{
    double mid = 0.0;
    
    for (NSUInteger i = 0; i < [binary length]; ++i)
    {
        if ([binary characterAtIndex:i] == '1')
        {
            min = mid;
        }
        else
        {
            max = mid;
        }
        
        mid = (max + min) / 2;
    }
    
    return mid;
}


NSUInteger binary_to_int(NSString *input)
{
    NSUInteger result, length;

    result = 0;
    length = [input length];

    for (NSUInteger i = 0; i < length; ++i)
    {
        if ([input characterAtIndex:i] == '1')
        {
            result += pow(2, length - i - 1);
        }
    }

    return result;
}


NSString * generate_binary(double input, double max, double min, int cutoff)
{
    NSMutableString     *result;
    double              mid;

    result = [NSMutableString string];
    for (int i = 0; i < cutoff; ++i)
    {
        mid = (max + min) / 2;

        if (input > mid)
        {
            [result appendString:@"1"];
            min = mid;
        }
        else
        {
            [result appendString:@"0"];
            max = mid;
        }
    }

    return [NSString stringWithString:result];
}


@implementation CLLocation(Geohash)

- (NSString *)geohash
{
    int cutoff = 15;
    NSString *base32_characters  = @"0123456789bcdefghjkmnpqrstuvwxyz";

    NSString            *bin_lat, *bin_lng;
    NSMutableString     *bin_packed, *result;
    
    bin_lat = generate_binary([self coordinate].latitude, 90.0, -90.0, cutoff);
    bin_lng = generate_binary([self coordinate].longitude, 180.0, -180.0, cutoff);

    bin_packed = [NSMutableString string];

    for (int i = 0; i < [bin_lat length]; ++i)
    {
        [bin_packed appendFormat:@"%c%c", [bin_lng characterAtIndex:i], [bin_lat characterAtIndex:i]];
    }

    result = [NSMutableString string];

    // extract by 5-bit.
    for (int i = 0; i < [bin_packed length] / 5; ++i)
    {
        NSUInteger index;
        index = binary_to_int([bin_packed substringWithRange:NSMakeRange(i * 5, 5)]);
        [result appendFormat:@"%c", [base32_characters characterAtIndex:index]];
    }

    return result;
}


+ (CLLocation *)locationFromGeohash:(NSString *)aGeohash
{
    NSString *base32_characters  = @"0123456789bcdefghjkmnpqrstuvwxyz";

    NSMutableString *bin_packed, *bin_lat, *bin_lng;

    bin_packed = [NSMutableString string];

    for (NSUInteger i = 0; i < [aGeohash length]; ++i)
    {
        NSString *character;
        character = [[NSMutableString stringWithFormat:@"%c", [aGeohash characterAtIndex:i]] lowercaseString];

        for (NSUInteger j = 0; j < [base32_characters length]; ++j)
        {
            if ([character isEqualToString:[NSString stringWithFormat:@"%c", [base32_characters characterAtIndex:j]]])
            {
                NSMutableString *binary;
                binary = [NSMutableString stringWithFormat:@"%@", int_to_binary(j)];

                NSUInteger length = [binary length];
                for (NSUInteger k = 0; k < 5 - length; ++k)
                {
                    [binary insertString:@"0" atIndex:0];
                }

                [bin_packed appendString:binary];
                break;
            }
        }
    }

    bin_lat = [NSMutableString string];
    bin_lng = [NSMutableString string];

    for (NSUInteger i = 0; i < [bin_packed length]; ++i)
    {
        if (i % 2)
        {
            // a latitude is composed of odd bits. 
            [bin_lat appendFormat:@"%c", [bin_packed characterAtIndex:i]];
        }
        else
        {
            // a longitude is composed of even bits.
            [bin_lng appendFormat:@"%c", [bin_packed characterAtIndex:i]];
        }
    }

    return [[CLLocation alloc] initWithLatitude:parse_binary(bin_lat, 90.0, -90.0)
                                      longitude:parse_binary(bin_lng, 180.0, -180.0)];
}


@end

NSStringでかなり遅いcharacterAtIndexを使いまくっている。

参考

Geohash – Wikipedia, the free encyclopedia
GeoHashのdecodeのアルゴリズムの解説します & ScalaのGeoHashライブラリを作ってみました(仮) – ゆろよろ日記
Delaunay Tessellation for iPhone

以下の文章はDelaunay Tessellation for iPhone | アクトインディ技術部隊報告書と同様のものです。

プログラムプレゼンテーションの第2回は、iPhoneを用いてDelaunay分割をするというものにしてみました。

本当は他のものをやるつもりだったのですが、前回のプログラムプレゼンテーションではkomagataさんがObjective-Cのキメラさ、カオスさをおもしろがっていたと勝手に仮定して、Objective-C++でさらなるカオスさを目指すことにしました。

そんな折りに以前ドロネー分割をするためのプログラムをつくって、アップロードしようかなといっていたのを思い出しました。

ということで、今回はそれを流用することにしました。
単純に移植するだけだから簡単だろと思ったところ、意外と手直しに時間がかかってしまいました。

ドロネー分割については計算幾何学で出てくるものですが、この余白はそれを書くのにはせますぎるということで、ググればきっとわかる!!!

ソースコードはこちらです。
ライブラリとしてBoost C++ Librariesを使用しています。

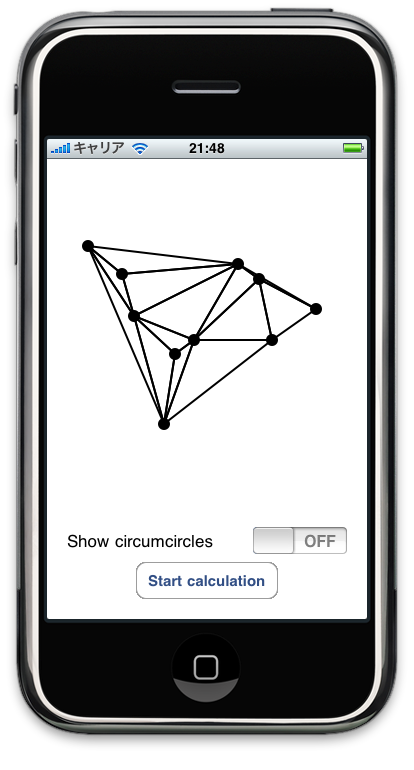
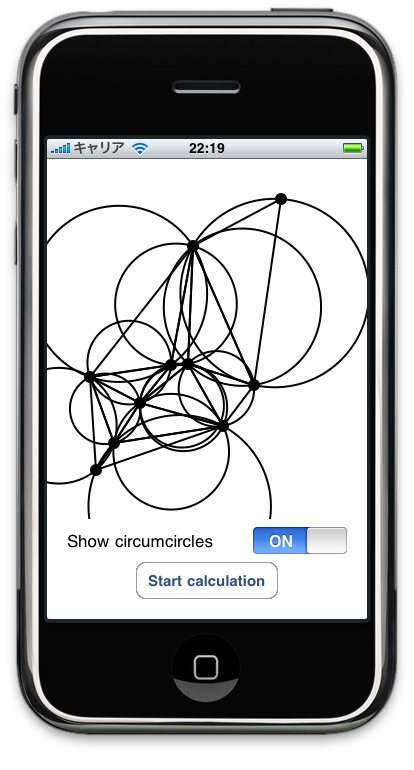
実行すると、毎回ランダムな10点を作成し、下図のようにドロネー分割された図が表示されます。

Delaunay tessellation   Delaunay tessellation with circumcircles

右側の図は外接円も表示させた場合です。
ドロネー分割では生成された三角形によって作られる外接円の中に、その三角形以外の点が含まれてはいけません。

ランダムな点を生成する部分にはboost::randomを用い、ドロネー分割を計算する部分はC++で書かれています。

Objective-CとC++のコードを混ぜる場合の注意点は、HMDTさんによくまとめられているのでこちらを参照していただくのがよいかと思います。
HMDT – Objective-C++

Objective-C++のソースを書かれるときは、.mとなっている拡張子を.mmにしてくださいね。
自分はこれをしないでObjective-C++のファイルだと認識されずはまりまくりました。

こんな風にC++のコードも簡単に使用することができるので、Objective-Cを使われている皆様もぜひ組み合わせてみてはいかがでしょうか???

P.S.
本当はNSOperationを使って、スレッドを新しく作ってバックグラウンドで処理をしたかったのですが、プログラムの構造上面倒なのでやめました。

参考
Objective-C プログラミング言語:C++ と Objective-C の併用
HMDT – Objective-C++